THE ULTIMATE RESOURCE FOR GIT AND GITHUB
DESCRIPTIVE AND THEORETICAL PART OF GIT
WHAT IS GIT AND WHY GIT?
Git is a Distributed Version Control System (DVCS) that tracks every modification made to a project's files over time. It allows developers to create a complete historical record of their codebase, enabling them to revert to any previous, stable version instantly. Unlike older centralized systems, Git ensures every user has a full, local copy of the entire project history, making it robust, fast, and capable of functioning completely offline.
Git is essential for professional development because it enables safe collaboration. It allows teams to work simultaneously on different features using isolated branches without interfering with the stable code. Furthermore, Git acts as a safety net, allowing developers to easily fix bugs, undo mistakes, and maintain an organized history through meaningful commit messages.
HOW TO CREATE A GIT PROJECT?
First, create a folder and open it in the Git Bash terminal.
Then enter your name and email id (required for first-time users) using the following commands:
- To set name:
git config --global user.name "Your name" - To set email:
git config --global user.email "Your email"
After doing this, you have to initialise a git repository locally:
Command: git init
Now create files using: touch filename.extension
CORE GIT CONCEPTS
TRACKED AND UNTRACKED FILES
Once you initialize a repository and add files, check the status using: git status.
It will initially show Untracked files (files Git is not watching yet).
To track a file, use: git add "file name".
STAGING AREA, COMMIT AND WORKING TREE
When you are modifying a file, it is in the Working Tree.
When you are done, you move it to the Staging Area using: git add "file name".
Commit means taking a snapshot of your staged files.
Command: git commit -m "descriptive message".
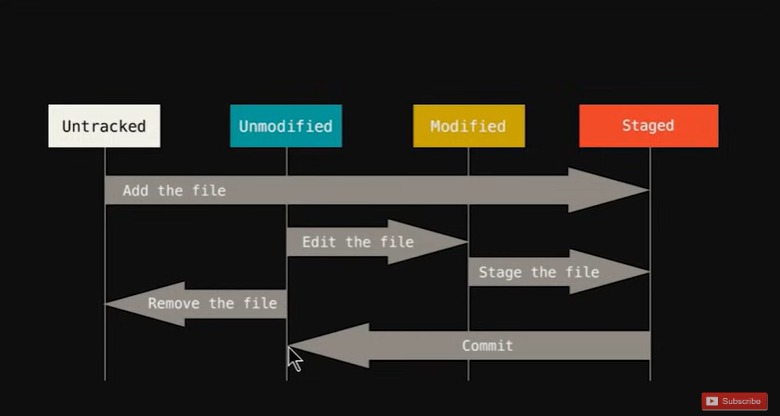
MODIFIED AND UNMODIFIED FILES
After committing, files become Unmodified. If you edit them again, they return to the Working Tree as Modified.
The following diagram describes the workflow cycle:
WHAT IS .gitignore?
.gitignore is a file containing names of files/folders Git should ignore.
Create it using: touch .gitignore.
- Ignore a specific file: Write
filename.txt - Ignore a file in root only: Write
/filename.txt - Ignore an entire directory: Write
folder_name/ - Ignore all files of a type: Write
*.extension(e.g.,*.css)
BRANCHING IN GIT
Why? To work on new features without breaking the main code (Production).
Commands:
- Create a branch:
git branch "branch_name" - Check branches:
git branch - Switch branch:
git checkout "branch_name" - Pro Tip (Create & Switch):
git checkout -b "branch_name" - Merge branch (go to master first):
git merge "branch_name"
LOCAL AND REMOTE REPOSITORY
LOCAL REPOSITORY
The version of your git project which resides locally on your computer (your hard drive). This is where you work, edit, and commit changes before sharing them.
REMOTE REPOSITORY
The version of your git project which is hosted on the internet or a hosting platform (like GitHub, GitLab). This is used for backup and team collaboration.
IMPORTANT GIT COMMANDS
GIT CHECKOUT (UNDO & NAVIGATE)
Used to switch branches or undo changes in a file before they are staged.
Undo changes in one file: git checkout "file name"
Undo changes in ALL files: git checkout -f
GIT LOG (HISTORY)
Used to check your commit history.
View all commits: git log
View last 'n' commits with details: git log -p -n
GIT DIFF (COMPARE)
Used to see exactly what lines of code changed.
- Compare Working Tree vs Staging:
git diff - Compare Staging vs Last Commit:
git diff --staged
GIT RM (DELETE)
Used to remove files.
- Delete from Staging AND Disk:
git rm "file name" - Delete from Staging ONLY (keep file on disk):
git rm --cached "file name"
GITHUB (WORKING WITH REMOTES)
CONNECTING LOCAL TO REMOTE (STEP-BY-STEP)
This process links the project on your laptop (Local) to a project on the internet (Remote).
STEP 1: Create an Empty Repo on GitHub
Go to your GitHub profile and create a new repository.
Important: If you already have code on your laptop, do not check the "Add a README file" box on GitHub. This avoids conflict errors.
STEP 2: Link the Repositories
Copy the HTTPS URL from GitHub (it ends with .git). In your local terminal, type:
git remote add origin "https://github.com/YOUR_USERNAME/REPO_NAME.git"
Explanation: "origin" is just a standardized nickname for that long URL. It tells Git where to send your files.
STEP 3: Rename Branch to Main
By default, local Git might name your branch "master", but GitHub uses "main". It is best practice to make them match.
git branch -M main
STEP 4: Push the Code
Now send your commits to GitHub for the first time:
git push -u origin main
Explanation: The -u flag sets the "upstream". This remembers the connection so in the future, you can just type git push.
CLONING A REPOSITORY (DOWNLOADING)
Cloning is used when you want to download a copy of a repository from GitHub to your computer. This is useful when you want to contribute to an open-source project or download a project you found online.
What actually happens: Git creates a new folder on your computer, downloads all the files, and crucially, downloads the entire commit history (every version of the project ever made).
Command: git clone "https://github.com/username/repo_name.git"
Note: You do not need to use git init before cloning. The clone command initializes the repository for you automatically.
PULLING CHANGES (UPDATING)
If you are working in a team, other developers might push code to GitHub while you are sleeping. If you try to push your code, Git will reject it because your local version is out of date.
To fix this, you must "Pull" the latest changes.
Command: git pull origin main
Behind the scenes: A git pull is actually two commands combined:
git fetch(Downloads the new data from GitHub but doesn't touch your files yet)git merge(Combines that downloaded data into your actual working files)
AUTHENTICATION (CRITICAL)
Since 2021, GitHub no longer accepts account passwords for Git operations in the terminal for security reasons. If you try to push and type your regular password, it will fail. You must use one of the following methods:
Option 1: Personal Access Token (PAT) - Easier
A PAT is like a long, random password generated by GitHub that you use instead of your real password.
How to do it: Go to GitHub Settings -> Developer Settings -> Personal Access Tokens -> Generate New Token.
When the terminal asks for a password, paste this token.
Option 2: SSH Keys - Professional
SSH (Secure Shell) keys are the industry standard for authentication. It allows your computer to talk to GitHub securely without you typing a password every time you push.
The Concept: Think of it like a specialized "Lock and Key".
- Public Key (The Lock): You upload this to GitHub. Anyone can see it, it's public. It acts like a padlock you put on your GitHub account.
- Private Key (The Key): This stays on your laptop. You never share this. It is the only key that can open the padlock you put on GitHub.
When you push code, GitHub checks if your Private Key matches the Public Key they have. If it matches, you are allowed to push.
How to set it up:
- Open Git Bash and type:
ssh-keygen -t ed25519 -C "your_email@example.com" - Press Enter to save the key (you can skip the passphrase by pressing Enter again).
- Display your new public key:
cat ~/.ssh/id_ed25519.pub - Copy the long code starting with "ssh-ed25519...".
- Go to GitHub Settings -> SSH and GPG keys -> New SSH Key -> Paste your key and save.
- Test the connection:
ssh -T git@github.com